Libellés

javaME (9) MIDlet (7) netbeans (7) MIDlets (6) Netbeans IDE et SVG (6) java (5) Push Registry (3) jad (3) SVG (2) Touch Enable (2) Visual mobile designer (2) WAP (2) WAP Push (2) web services - soap - uddi (2) CRUD (1) IMEI (1) JPA (1) JSP (1) Lwuit (1) Persistent (1) PersistentUnit (1) RAD (1) SMS (1) Servlet (1) databinding (1) security (1)
Affichage des articles dont le libellé est Netbeans IDE et SVG. Afficher tous les articles

vendredi 27 mai 2011

Creating a Touch Enabled SVG UI for Java ME Devices

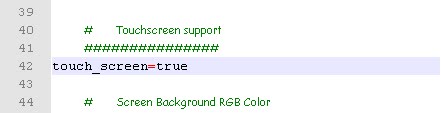
question here for you to test your mobile application in a touch screen. For this reason you need to enable this functionality in the configuration file for the device you use (in our example is the DefaultColorPhone). In this file option is marked FALSE touch_screen ... do not wait until I tell you to TRUE I think it makes sense.


After this change you can test your application. In our case it is a simple application (and unnecessary) that is achieved with the ease of svg included in this NetBeans User Interface. You can notice that the cross walk on the screen? That is, in fact this is cross your finger or that of the user, so you can test your application.

[The application (simple and useless) consist to write a text in the field provided and press the button with your finger so that the label is set to take down the text]


Enjoy!


dimanche 22 mai 2011

DATABINDING, WEB SERVICE and NETBEANS IDE

 DataBinding, Web Services and NetBeans 6.7

Prerequis Prerequisites
  - JavaME
- Netbeans Visual Mobile Designer Tool
- Netbeans Web Service Client Wizard tool

databinding Component
The element of NetBeans 6.7 IDE databinding is an easy to use tools to link these variables so that their changes be synchronous.  It will produce an architecture of data link in your MIDlet and everything you have to do is to specify who is linked with that and that operations will take place on the variables.

  The web service
In this tutorial we'll use databinding to display information from a previously created web service with Netbeans IDE. Our web service is just happy to tell you .... hello.(We'll keep it simple is the principle that counts). and our mobile application allows you to provide your name as parameter web service. A variable will be bound (databinding) to these various transactions and update the result of web service whenever you provide a new setting.
This is an example that you can just enter the operating mode of the tool databinding this in Netbeans.

  -> Create a new web project -> select a server (eg tomcat) -> Once you create the project done right click on the node -> choose new file -> web service
-> A file is created -> click on the small bulb notified by Netbeans and add a task to your web service.
Here is my final code example:
------------------------------------------------------------------------------------------------------ -------------------------------------------------- -------------------------------------------------- -
public class bonjourWS {

@WebMethod(operationName = "getMyPass")
public String operation(@WebParam(name = "nomParam")
String nomParam) {

return"Bonjour "+nomParam;
}
}
Right click on the file of your web service and test your web service.

JavaME client
 Use the Web service client JavaME netbeans wizard to generate a client in your mobile application. Right click on your mobile project -> web service client JavaME -> ....
After generating the code check if the stub was also generated if the file open. Wsclient that was generated and click "generate stubs"


 Application flow
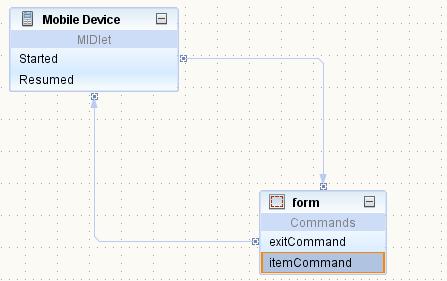
With the tools Visual MIDlet design a simple flow like this
  
 Application screen
 Add the DataSet item to the palette in your application and add resources in two images in PNG format in the directory of your project.

Place items in the NetBeans palette as you see in the image below 
For the numbering here is what the work to be done:

1 -> right click -> property -> image -> databinding -> box and select dataSet [DataSet]
-> Enter in dataSet.photo EL Read "this just means that the term" picture "that will allow us to link the image to display to that of a variable with the ticket databinding.


2 -> right click -> property -> text -> databinding -> box and select dataSet [DataSet]
-> entrez dataSet.nom dans "EL Read" ceci signifie juste que c'est le terme "nom" qui nous permettra de lier le texte de cet champ à une variable par le billet du databinding. -> Enter in dataSet.nom EL Read "this just means that the term" name "that will allow us to link the text of the field to a variable with the ticket databinding. C'est sur ce champ de texte que nous utiliserons notre web service. It is on this text field that we will use our web service.


3 - As we did with the addition of the DataSet component in our project done on such a resource to add images in the code.

The application code
Go to the "Source" of the Visual Mobile Designer and add a declaration for an instance of the Stub class that you generate.  In my case it corresponds to the code:
 
-------------------------------------------------------------------------------------------------------------------------------------------
private bonjourWSService_Stub bews = new bonjourWSService_Stub();
-------------------------------------------------------------------------------------------------------------------------------------------

Locate the getValue method and adjust it by inserting a code similar to this one

------------------------------------------------------------------------------------------------------------------------------------------
public Object getValue(String name) throws IllegalStateException {

String a = choiceGroup.getString(choiceGroup.getSelectedIndex());

if (name.equals("nom")) {

/ * Note: The following clause if you use to specify what to do with the element of appointed dataSet.nom databinding * /

try {
/ / THIS IS OUR VERY SMALL CODE

return bews.getMyPass(a);
/ * Note: Bews is the subject of the Stub class we instantiated. just by typing "Bews." NetBeans offers a list of methods available for this purpose and among these methods it appears that our web service. . I call it so she and I pass a parameter value of the local variable "a". As you have noticed, a contains the value of field checked (name of the character chosen) * /
catch (RemoteException ex) {
ex.printStackTrace();
}
}
if (name.equals("photo")) {

  / * You can thanks to databinding to match that image to an image provided by a web service, but that's a matter aute .... */
}

}
return null;
} 
Test your application

 The application works fine now you are able to, efficiently handle the tool databinding in your applications to Netbeans mobile ... at least I hope so. Your suggessions are the property came.
[NOTE: The databinding as we have done will be done at application launch. To make it more dynamic set the command "validate" a method that will refresh the variables. Or you use two forms, one for the user's choice and one for displaying the result. .. ..  this tutorial is called to be improved at any time]
I just wanted to do so ...

dimanche 18 avril 2010

TESTER APPLICATION JAVAME POUR ECRAN TACTILE

il est question ici pour vous de tester votre application mobile dans un environnement à écran tactile. Pour cette raison vous devez activer cette fonctionnalités dans le fichier de configuration de la device que vous utilisez (Dans notre exemple c'est le defaultcolorphone). Dans ce fichier l'option touch_screen est marqué FALSE ... n'attendez pas que je vous dise de mettre TRUE je crois que c'est logique.
Après cette modification vous pouvez tester votre application. Dans notre cas il s'agit d'une application simple (et inutile) qui est réalisé avec les facilité du svg User Interface inclusent dans Netbeans. Vous pouvez remarquez la croix qui se balade sur l'écran ? Voilà, en fait cette croix c'est votre doigt ou celui de l'utilisateur, vous pouvez donc tester votre application.
[L'application simple et inutile consiste en fait à ecrire un texte dans le champ reservé et d'appuyer le bouton avec votre doigt pour que le label d'en bas prenne pour valeur ce texte]
Enjoy !

vendredi 5 mars 2010

COMBINER LA PUISSANCE DE LWUIT DESIGNER et CELLE DU VISUAL MOBILE DESIGNER DE NETBEANS

LWUIT une API qui permet la création d'Interface grahique très attrayantes pour application mobile. Je n'ai pas l'intention de vous faire un tuto sur LWUIT mais plutôt de vous montrer comment vous pourrez combiner la puissance de LWUIT designer à celle du Visual Mobile designer intégré dans Netbeans. Vous pourrez vous même trouver un tutoriel bien fait sur LWUIT dans le site de SUN, l'article est titré : "The Lightweight User Interface Toolkit (LWUIT): An Introduction".


Vous pourrez vous même trouver un tutoriel bien fait sur LWUIT dans le site de SUN, l'article est titré : "The Lightweight User Interface Toolkit (LWUIT): An Introduction".

POSONS LE DECOR

Comme vous pouvez le voir sur le dessin du dessus, Visual Mobile Designer vous facilite la gestion des flux et des affichages de votre application ainsi que le code des éléments actifs. Tout ceci en générant du code pour vous. Sauf que les graphisme utilisent : import javax.microedition.lcdui.*; ... C'est pas jolie - jolie à voir.

LWUIT quand à lui vous créer une UI nettement plus belle à voir et riche en possibilités ... sauf que ce sera à vous de codé l'application javaME pour utiliser une ressource générée par LWUIT ... c'est bien mais le programmeur c'est toujours un gros parresseux donc... QUE FAIRE POUR UTILISER SES DEUX FONCTIONNALITEES EN MEME TEMPS, ... sachant que le code généré par le visual mobile designer de netbeans n'est pas retouchable dans l'outils lui même ???


COMMENCONS

1) Dans le repertoire "util" de votre décompression LWUIT se trouve "ResourceEdit.exe" Lancer cet outils et créez votre ressource LWUIT. C'est relativement simple, vou pouvez y arriver avec ou sans tutoriel. Ne vous préoccupez pas de l'aspect code de votre application, cet outils de LWUIT ne gère que le design donc concntrez vous sur le DESIGN. Si vous avez beoin d'un tuto malgrés tout alors consultez l'article de SUN mentionné plus haut. Pour notre exemple voici notre ressource nommé: gsk.res


2) Créez votre application javaME en utilisant Visual Mobile Designer de Netbeans

Concevez normalement le code de votre application. dans l'exemple notre application est très simplifiée. Au démarrage nous nous retrouvons devant un formulaire qui possède un menu à 3 item. l'un des item ferme l'application, voilà c'est tout mais suffisant pour voir les retouches qu'il faudra par la suite faire pour intégrer dans cette application notre design conçu avec lwuit designer.


3) Créer une nouvelle classe principale dans le repertoire de votre application et copier tout le code généré par le VMD à l’intérieur de cette nouvelle classe. Corriger les erreurs de nommage sur la nouvelle classe, sur son constructeur et enlevez les implements.

-> Ajoutez la librairie lwuit.jar dans votre projet

4) Notre travail consistera principalement à traquer les erreurs sur le code pour l’unifier avec le design conçu dans lwuit designer.

è Remplacer les importations (pas de lcdui dans les import) voici les import les plus necessaires :

import javax.microedition.midlet.*;

import com.sun.lwuit.Form;

import com.sun.lwuit.Command;

import com.sun.lwuit.events.ActionEvent;

import com.sun.lwuit.Display;

import com.sun.lwuit.plaf.UIManager;

import com.sun.lwuit.util.Resources;

import java.io.IOException;

è Dans la methode startApp() ajouter au debut ce code:

try {

Display.init(this);

Resources r = Resources.open("/gsk.res");

UIManager.getInstance().setThemeProps(r.getTheme("gsk"));

//gsk c’est le nom que vous avez donné au theme dans le fichier .res

} catch (IOException ex) {

ex.printStackTrace();

}

è Supprimer les methodes switchDisplay et getDisplay ou les mettre en commentaire

( /* */ )

è Ajoutez dans le code des methodes «get » le bout de code tel que mentionné en dessous :

public Command getScreenCommand1() {

if (screenCommand1 == null) {

screenCommand1 = new Command("Screen", 0)

{

public void actionPerformed(ActionEvent evt) { // CODE A INSRER }

};

}

return screenCommand1;

}

-> Regarder la methode commandAction() Il ya là les codes d’action pour chaque composant actif dans notre formulaire. Copier ces codes et insérer les dans les methodes actionPerformed() des methodes « get » correspondantes pour chacun des composants actifs du formulaire.

-> Dans la methode startMIDlet() remplacer le code par : getForm().show();

-> Corriger les petites erreurs de syntaxes restantes, s’il y’en a et executer votre application.