
I can see your head ... You say "I hope there's a solution." It's funny but I realized that some visitors arrived on this blog after placing a google search, mainly including the keyword '_delete_notify.dat.'
The problem is that the page of this blog that has that keyword does nothing to solve this problem. I decided to tour the java forums and wow! no walkthrough. So I have a little something for you.
What is that file _delete_notify.dat. ?
Weed I do not know ...
No, What you should understand is that:
1 - this issue does not affect your java code
2 - The NetBeans IDE uses as seamlessly deploy OTA when you launch your MIDlet. They thus create a more or less temporary URL that issues the fichier.JAD to your mobile virtual (emulation of the MIDP wireless toolkit).
3 - fichier.JAD says is supposed to be downloaded before execution of the program on the emulator. Notice the line above your error in the console:
Starting emulator in execution mode
Installing result from: http://127.0.0.1:1254/VotreMIDlet.jad
[WARN] [rms] javacall_file_open: _wopen failed for C: \ Documents and Settings \ be \ JavaME-sdk \ 3.0 \ work \ 0 \ appdb \ _delete_notify.dat
- This problem occurs when downloading the emulator to fichier.jad Mobile Wireless Toolkit
4 - Finally, delete_notify is an attribute present in the fichier.jad
So what can you do?
Two smalls things :
- open Fichier.jad with notepad and delete the lines as:
"MIDlet-Install-Notify, MIDlet-Delete-Notify, MIDlet-Delete-Confirm" (Unless you need it)
- Create with notepad an empty file and name it "_delete_notify.dat" ... copy and paste it exactly where the error claim it. it should work.
visit this link OTA: Deployment-ota-over-air-cest-what-ota
Affichage des articles dont le libellé est MIDlet. Afficher tous les articles
Affichage des articles dont le libellé est MIDlet. Afficher tous les articles
vendredi 27 mai 2011


JAD: Java Application Descriptor
JAD, pour Java Application Descriptor, est un fichier texte qui contient des informations sur l’application. Il est principalement utiliser lors du péploiement d'application par OTA.
Un article très détaillé sur le déploiement OTA est disponible sur ce même BLOG. Le fonctionnement d'un fichier.jar ne depend pas de son fichier.jad si le fichier.jar est directement executé sur votre mobile. Les fournisseurs d'applications JAVA utilise donc le fichier.jad pour masquer le fichier.jar et surtout calibrer le déploiement de leurs applications en fonction du modèle du mobile du client. le fichier.jad peut même notifier le fournisseur lorsque vous désinstaller son application. Rappellez vous ces logiciels informatique qui à la désinstallation vous ouvre une page web...
Plusieurs options peuvent être configuré lors de l’écriture de ce fichier. Cet article se contente juste de vous présenter les options d'un fichier JAD
Les attributs obligatoires sont:
MIDlet-Name
MIDlet-Version
MIDlet-Vendor
MIDlet-Jar-URL
MIDlet-Jar-Size
MIDlet-: MIDletName , [IconPathname] , ClassName
MicroEdition-Profile
MicroEdition-Configuration
Sans ces attributs l'AMS (Application Management Software) présent sur votre mobile refusera d'installer l'application par OTA.
Attributs optionnels:
MIDlet-Description
MIDlet-Icon
MIDlet-Info-URL
MIDlet-Data-Size
MIDlet-Permissions
MIDlet-Permissions-Opt
MIDlet-Push-
MIDlet-Install-Notify
MIDlet-Delete-Notify
MIDlet-Delete-Confirm
Sachez surtout que NETBEANS génère automatiquement votre fichier.JAD à chacun de vos projet javaME et qu'un clique droit sur les propriétés du projet vous permet d'éditer le fichier.JAD à l'aide d'une inerface ... euh je ne dirait pas WYSIWYG. Vous pouvez ainsi facilement configurer les options de bases. N'hésitez pas à poser des question si vous voulez un exemple complet d'utilisation de chacun de ces attributs. comme MIDlet-Permissions utilisé avec le RMS ou encore MIDlet-Push très pratique pour lancer l'appli du mobile automatiquement: Voir l'article sur le WAP-PUSH.
Allez, a vos IDE ! Les Classes attendent vos doigts.
Un article très détaillé sur le déploiement OTA est disponible sur ce même BLOG. Le fonctionnement d'un fichier.jar ne depend pas de son fichier.jad si le fichier.jar est directement executé sur votre mobile. Les fournisseurs d'applications JAVA utilise donc le fichier.jad pour masquer le fichier.jar et surtout calibrer le déploiement de leurs applications en fonction du modèle du mobile du client. le fichier.jad peut même notifier le fournisseur lorsque vous désinstaller son application. Rappellez vous ces logiciels informatique qui à la désinstallation vous ouvre une page web...
Plusieurs options peuvent être configuré lors de l’écriture de ce fichier. Cet article se contente juste de vous présenter les options d'un fichier JAD
Les attributs obligatoires sont:
MIDlet-Name
MIDlet-Version
MIDlet-Vendor
MIDlet-Jar-URL
MIDlet-Jar-Size
MIDlet-: MIDletName , [IconPathname] , ClassName
MicroEdition-Profile
MicroEdition-Configuration
Sans ces attributs l'AMS (Application Management Software) présent sur votre mobile refusera d'installer l'application par OTA.
Attributs optionnels:
MIDlet-Description
MIDlet-Icon
MIDlet-Info-URL
MIDlet-Data-Size
MIDlet-Permissions
MIDlet-Permissions-Opt
MIDlet-Push-
MIDlet-Install-Notify
MIDlet-Delete-Notify
MIDlet-Delete-Confirm
Sachez surtout que NETBEANS génère automatiquement votre fichier.JAD à chacun de vos projet javaME et qu'un clique droit sur les propriétés du projet vous permet d'éditer le fichier.JAD à l'aide d'une inerface ... euh je ne dirait pas WYSIWYG. Vous pouvez ainsi facilement configurer les options de bases. N'hésitez pas à poser des question si vous voulez un exemple complet d'utilisation de chacun de ces attributs. comme MIDlet-Permissions utilisé avec le RMS ou encore MIDlet-Push très pratique pour lancer l'appli du mobile automatiquement: Voir l'article sur le WAP-PUSH.
Allez, a vos IDE ! Les Classes attendent vos doigts.
Creating a Touch Enabled SVG UI for Java ME Devices
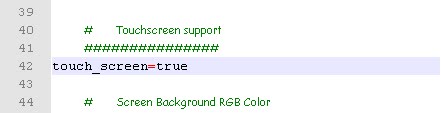
question here for you to test your mobile application in a touch screen. For this reason you need to enable this functionality in the configuration file for the device you use (in our example is the DefaultColorPhone). In this file option is marked FALSE touch_screen ... do not wait until I tell you to TRUE I think it makes sense.
After this change you can test your application. In our case it is a simple application (and unnecessary) that is achieved with the ease of svg included in this NetBeans User Interface. You can notice that the cross walk on the screen? That is, in fact this is cross your finger or that of the user, so you can test your application.

[The application (simple and useless) consist to write a text in the field provided and press the button with your finger so that the label is set to take down the text]
Enjoy!
After this change you can test your application. In our case it is a simple application (and unnecessary) that is achieved with the ease of svg included in this NetBeans User Interface. You can notice that the cross walk on the screen? That is, in fact this is cross your finger or that of the user, so you can test your application.
[The application (simple and useless) consist to write a text in the field provided and press the button with your finger so that the label is set to take down the text]
Enjoy!
dimanche 22 mai 2011
DATABINDING, WEB SERVICE and NETBEANS IDE
DataBinding, Web Services and NetBeans 6.7
Prerequis Prerequisites
- JavaME
- Netbeans Visual Mobile Designer Tool
- Netbeans Web Service Client Wizard tool
databinding Component
The element of NetBeans 6.7 IDE databinding is an easy to use tools to link these variables so that their changes be synchronous. It will produce an architecture of data link in your MIDlet and everything you have to do is to specify who is linked with that and that operations will take place on the variables.
The web service
In this tutorial we'll use databinding to display information from a previously created web service with Netbeans IDE. Our web service is just happy to tell you .... hello.(We'll keep it simple is the principle that counts). and our mobile application allows you to provide your name as parameter web service. A variable will be bound (databinding) to these various transactions and update the result of web service whenever you provide a new setting.
This is an example that you can just enter the operating mode of the tool databinding this in Netbeans.
-> Create a new web project -> select a server (eg tomcat) -> Once you create the project done right click on the node -> choose new file -> web service
-> A file is created -> click on the small bulb notified by Netbeans and add a task to your web service.
Here is my final code example:
------------------------------------------------------------------------------------------------------ -------------------------------------------------- -------------------------------------------------- -
public class bonjourWS {
@WebMethod(operationName = "getMyPass")
public String operation(@WebParam(name = "nomParam")
String nomParam) {
return"Bonjour "+nomParam;
}
}
Right click on the file of your web service and test your web service.
JavaME client
Use the Web service client JavaME netbeans wizard to generate a client in your mobile application. Right click on your mobile project -> web service client JavaME -> ....
After generating the code check if the stub was also generated if the file open. Wsclient that was generated and click "generate stubs"
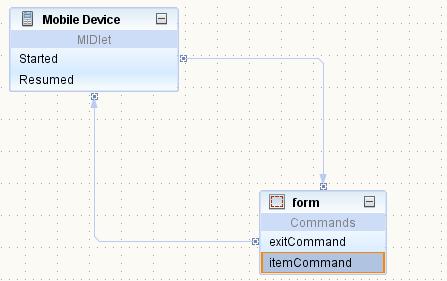
 Place items in the NetBeans palette as you see in the image below
For the numbering here is what the work to be done:
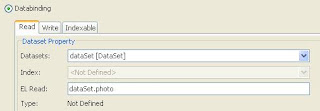
1 -> right click -> property -> image -> databinding -> box and select dataSet [DataSet]
-> Enter in dataSet.photo EL Read "this just means that the term" picture "that will allow us to link the image to display to that of a variable with the ticket databinding.
2 -> right click -> property -> text -> databinding -> box and select dataSet [DataSet]
-> entrez dataSet.nom dans "EL Read" ceci signifie juste que c'est le terme "nom" qui nous permettra de lier le texte de cet champ à une variable par le billet du databinding. -> Enter in dataSet.nom EL Read "this just means that the term" name "that will allow us to link the text of the field to a variable with the ticket databinding. C'est sur ce champ de texte que nous utiliserons notre web service. It is on this text field that we will use our web service.
3 - As we did with the addition of the DataSet component in our project done on such a resource to add images in the code.
The application code
Go to the "Source" of the Visual Mobile Designer and add a declaration for an instance of the Stub class that you generate. In my case it corresponds to the code:
-------------------------------------------------------------------------------------------------------------------------------------------
private bonjourWSService_Stub bews = new bonjourWSService_Stub();
-------------------------------------------------------------------------------------------------------------------------------------------
Locate the getValue method and adjust it by inserting a code similar to this one
------------------------------------------------------------------------------------------------------------------------------------------
public Object getValue(String name) throws IllegalStateException {
String a = choiceGroup.getString(choiceGroup.getSelectedIndex());
if (name.equals("nom")) {
/ * Note: The following clause if you use to specify what to do with the element of appointed dataSet.nom databinding * /
/ / THIS IS OUR VERY SMALL CODE
return bews.getMyPass(a);
/ * Note: Bews is the subject of the Stub class we instantiated. just by typing "Bews." NetBeans offers a list of methods available for this purpose and among these methods it appears that our web service. . I call it so she and I pass a parameter value of the local variable "a". As you have noticed, a contains the value of field checked (name of the character chosen) * /
catch (RemoteException ex) {
ex.printStackTrace();
}
}
if (name.equals("photo")) {
/ * You can thanks to databinding to match that image to an image provided by a web service, but that's a matter aute .... */
}
}
return null;
}
Test your application

[NOTE: The databinding as we have done will be done at application launch. To make it more dynamic set the command "validate" a method that will refresh the variables. Or you use two forms, one for the user's choice and one for displaying the result. .. .. this tutorial is called to be improved at any time]
I just wanted to do so ...
Prerequis Prerequisites
- JavaME
- Netbeans Visual Mobile Designer Tool
- Netbeans Web Service Client Wizard tool
databinding Component
The element of NetBeans 6.7 IDE databinding is an easy to use tools to link these variables so that their changes be synchronous. It will produce an architecture of data link in your MIDlet and everything you have to do is to specify who is linked with that and that operations will take place on the variables.
The web service
In this tutorial we'll use databinding to display information from a previously created web service with Netbeans IDE. Our web service is just happy to tell you .... hello.(We'll keep it simple is the principle that counts). and our mobile application allows you to provide your name as parameter web service. A variable will be bound (databinding) to these various transactions and update the result of web service whenever you provide a new setting.
This is an example that you can just enter the operating mode of the tool databinding this in Netbeans.
-> Create a new web project -> select a server (eg tomcat) -> Once you create the project done right click on the node -> choose new file -> web service
-> A file is created -> click on the small bulb notified by Netbeans and add a task to your web service.
Here is my final code example:
------------------------------------------------------------------------------------------------------ -------------------------------------------------- -------------------------------------------------- -
public class bonjourWS {
@WebMethod(operationName = "getMyPass")
public String operation(@WebParam(name = "nomParam")
String nomParam) {
return"Bonjour "+nomParam;
}
}
Right click on the file of your web service and test your web service.
JavaME client
Use the Web service client JavaME netbeans wizard to generate a client in your mobile application. Right click on your mobile project -> web service client JavaME -> ....
After generating the code check if the stub was also generated if the file open. Wsclient that was generated and click "generate stubs"


For the numbering here is what the work to be done:
1 -> right click -> property -> image -> databinding -> box and select dataSet [DataSet]
-> Enter in dataSet.photo EL Read "this just means that the term" picture "that will allow us to link the image to display to that of a variable with the ticket databinding.

2 -> right click -> property -> text -> databinding -> box and select dataSet [DataSet]
-> entrez dataSet.nom dans "EL Read" ceci signifie juste que c'est le terme "nom" qui nous permettra de lier le texte de cet champ à une variable par le billet du databinding. -> Enter in dataSet.nom EL Read "this just means that the term" name "that will allow us to link the text of the field to a variable with the ticket databinding. C'est sur ce champ de texte que nous utiliserons notre web service. It is on this text field that we will use our web service.
3 - As we did with the addition of the DataSet component in our project done on such a resource to add images in the code.
The application code
Go to the "Source" of the Visual Mobile Designer and add a declaration for an instance of the Stub class that you generate. In my case it corresponds to the code:
-------------------------------------------------------------------------------------------------------------------------------------------
private bonjourWSService_Stub bews = new bonjourWSService_Stub();
-------------------------------------------------------------------------------------------------------------------------------------------
Locate the getValue method and adjust it by inserting a code similar to this one
------------------------------------------------------------------------------------------------------------------------------------------
public Object getValue(String name) throws IllegalStateException {
String a = choiceGroup.getString(choiceGroup.getSelectedIndex());
if (name.equals("nom")) {
/ * Note: The following clause if you use to specify what to do with the element of appointed dataSet.nom databinding * /
/ / THIS IS OUR VERY SMALL CODE
return bews.getMyPass(a);
/ * Note: Bews is the subject of the Stub class we instantiated. just by typing "Bews." NetBeans offers a list of methods available for this purpose and among these methods it appears that our web service. . I call it so she and I pass a parameter value of the local variable "a". As you have noticed, a contains the value of field checked (name of the character chosen) * /
catch (RemoteException ex) {
ex.printStackTrace();
}
}
if (name.equals("photo")) {
/ * You can thanks to databinding to match that image to an image provided by a web service, but that's a matter aute .... */
}
}
return null;
}
Test your application

[NOTE: The databinding as we have done will be done at application launch. To make it more dynamic set the command "validate" a method that will refresh the variables. Or you use two forms, one for the user's choice and one for displaying the result. .. .. this tutorial is called to be improved at any time]
I just wanted to do so ...
dimanche 18 avril 2010
TESTER APPLICATION JAVAME POUR ECRAN TACTILE
il est question ici pour vous de tester votre application mobile dans un environnement à écran tactile. Pour cette raison vous devez activer cette fonctionnalités dans le fichier de configuration de la device que vous utilisez (Dans notre exemple c'est le defaultcolorphone). Dans ce fichier l'option touch_screen est marqué FALSE ... n'attendez pas que je vous dise de mettre TRUE je crois que c'est logique.
 Après cette modification vous pouvez tester votre application. Dans notre cas il s'agit d'une application simple (et inutile) qui est réalisé avec les facilité du svg User Interface inclusent dans Netbeans. Vous pouvez remarquez la croix qui se balade sur l'écran ? Voilà, en fait cette croix c'est votre doigt ou celui de l'utilisateur, vous pouvez donc tester votre application.
 [L'application simple et inutile consiste en fait à ecrire un texte dans le champ reservé et d'appuyer le bouton avec votre doigt pour que le label d'en bas prenne pour valeur ce texte]
Enjoy !
Après cette modification vous pouvez tester votre application. Dans notre cas il s'agit d'une application simple (et inutile) qui est réalisé avec les facilité du svg User Interface inclusent dans Netbeans. Vous pouvez remarquez la croix qui se balade sur l'écran ? Voilà, en fait cette croix c'est votre doigt ou celui de l'utilisateur, vous pouvez donc tester votre application.[L'application simple et inutile consiste en fait à ecrire un texte dans le champ reservé et d'appuyer le bouton avec votre doigt pour que le label d'en bas prenne pour valeur ce texte]Enjoy !
mercredi 14 avril 2010
lancer automatiquement MIDlet, Utiliser le Push Registry.
Le message d'origine à partir de: http://developers.sun.com/mobility/midp/questions/pushregistry/
Si vous voulez lancer automatiquement MIDlet, vous pouvez utiliser le Push Registry.
Comment faire?
La classe PushRegistry soutient un "push" modèle de distribution de contenu. Permettre à un MIDlet pour lancer en réponse à une connexion entrante ou à une heure programmée fait ensemble de nouvelles classes de services possible.
Spécification d'une entrée PushRegistry nécessite quatre éléments:
* Le MIDlet être lancé, spécifié à l'aide de l'attribut MIDlet-.
* Si la suite de MIDlets est signé, une demande autorisations, en utilisant l'attribut MIDlet-autorisations. La demande doit comprendre au moins la méthode javax.microedition.io.PushRegistry.
* Une connexion entrante URL, requis par le Connector.open () méthode.
* Un filtre pour les connexions entrantes. Le format du filtre est spécifique au protocole, mais le filtre "*" correspond à toute chaîne, et "?" correspond à tout caractère unique.
Une entrée PushRegistry peut être spécifiée soit dans une forme statique ou dynamique.
Une entrée statique PushRegistry est spécifié dans le descripteur d'application Java (JAD), le fichier manifeste, ou les deux. Le MIDlet, une fois installé, toujours répondre à la connexion spécifiée entrants. Ajouter le MIDlet, Push registre, et autorisations attribue à la JAD ou manifeste, comme dans cet exemple JAD:
MIDlet-1: CalPushHandler
MIDlet-Permissions: javax.microedition.io.PushRegistry,
javax.microedition.io.Connector.socket
MIDlet-Push-1: socket: / /: 5012, CalPushHandler, *
Ces paramètres seront la cause CalPushHandler MIDlet de lancer en réponse à une demande de connexion entrante sur le port 5012.
Une entrée dynamique PushRegistry est bien le même que une entrée statique sauf que vous utilisez le PushRegistry.registerConnection () pour spécifier le Push Entrée au lieu d'utiliser le MIDlet-Push- attribut. L'attribut MIDlet- est toujours nécessaire dans la JAD ou manifeste, comme c'est le MIDlet-autorisations d'attribut, dans le cas d'une suite MIDlet signé. Une entrée dynamique peut être activée (désactivée à l'aide et l'PushRegistry.unregisterConnection () méthode) après l'installation suite de MIDlets. Un exemple de fichier JAD devrait contenir:
MIDlet-1: CalPushHandler
MIDlet-Permissions: javax.microedition.io.PushRegistry,
javax.microedition.io.Connector.socket
Le code source MIDlet sont les suivantes:
...
javax.microedtion.io.PushRegistry d'importation;
...
String connURL = "socket: / /: 5012";
MIDletStr String = "CalPushHandler";
FilterStr String = "*";
try (
PushRegistry.registerConnection (connURL,
MIDletStr, FilterStr);
) Catch (ClassNotFoundException CNF) (
...
) Catch (IOException ioe) (
...
)
...
Utilisation des alarmes pour lancer MIDlets
Le PushRegistry.registerAlarm () méthode présente un MIDlet pour lancer à une heure programmée. Il est proche de UNIX à (1) l'installation. La méthode nécessite un MIDlet dans la série actuelle de lancer, avec un temps. Spécifiez le MIDlet comme une chaîne et l'époque comme un java.util.Date. Un échantillon suit.
Dans la JAD ou fichier manifeste, insérer:
MIDlet-1: AlarmMIDlet
MIDlet-Permissions: javax.microedition.io.PushRegistr
Dans le code source MIDlet comprennent:
...
javax.microedtion.io.PushRegistry d'importation;
...
prevalarm long;
MIDletname String = "AlarmMIDlet";
nexttime Date = java.util.Date nouvelle () + 60000;
prevalarm = PushRegistry.registerAlarm (MIDletname, nexttime);
...
La spécification MIDP 2.0 limite le nombre d'alarmes par MIDlet dans une suite à un.
Notez que la spécification n'exige pas mises en œuvre pour soutenir ces caractéristiques PushRegistry. S'ils ne sont pas pris en charge, une exception sera levée ConnectionNotFoundException.
Un exemple
La suite de MIDlets échantillon illustre l'utilisation d'une entrée statique PushRegistry et du PushRegistry.registerAlarm () méthode. Notez que la suite de MIDlets ne comprend pas les composants de l'interface.
La suite de MIDlets contient deux MIDlets et une autre classe. Le PushMIDlet prévoit un délai de journée (TSD) service (voir: Internet Engineering Task Force RFC 867) en utilisant la classe DayTimeServer. DayTimeServer implémente l'interface Runnable, l'exécution du service TSD dans un thread séparé. DayTimeServer ouvre la connexion au serveur, accepte la connexion entrante (l'événement qui a initié le lancement MIDlet en premier lieu), répond au client avec l'heure actuelle comme une chaîne, ferme les connexions, et des sorties. Dans l'ensemble, pas très excitant, mais indicatif et extensible.
Le PushMIDlet enregistre également la AlarmMIDlet d'exécution 60 secondes après la PushMIDlet est lancé. Le AlarmMIDlet simplement re-soi calendriers à l'aide PushRegistry.registerAlarm (). Le résultat est le lancement récurrent de la MIDlet, semblable à la cron UNIX (1M) installation. Le AlarmMIDlet peut être facilement étendu pour inclure des activités plus intéressantes à être exécutés périodiquement.
Conclusion
Les deux nouveaux mécanismes de lancement de MIDlet que le MIDP 2.0 classe PuhRegistry prévoit de rendre possible la création de services plus riches en contenu. Pour plus d'informations sur le bouton enregistrer, voir l'article Le Push Registry MIDP 2.0
Si vous voulez lancer automatiquement MIDlet, vous pouvez utiliser le Push Registry.
Comment faire?
La classe PushRegistry soutient un "push" modèle de distribution de contenu. Permettre à un MIDlet pour lancer en réponse à une connexion entrante ou à une heure programmée fait ensemble de nouvelles classes de services possible.
Spécification d'une entrée PushRegistry nécessite quatre éléments:
* Le MIDlet être lancé, spécifié à l'aide de l'attribut MIDlet-
* Si la suite de MIDlets est signé, une demande autorisations, en utilisant l'attribut MIDlet-autorisations. La demande doit comprendre au moins la méthode javax.microedition.io.PushRegistry.
* Une connexion entrante URL, requis par le Connector.open () méthode.
* Un filtre pour les connexions entrantes. Le format du filtre est spécifique au protocole, mais le filtre "*" correspond à toute chaîne, et "?" correspond à tout caractère unique.
Une entrée PushRegistry peut être spécifiée soit dans une forme statique ou dynamique.
Une entrée statique PushRegistry est spécifié dans le descripteur d'application Java (JAD), le fichier manifeste, ou les deux. Le MIDlet, une fois installé, toujours répondre à la connexion spécifiée entrants. Ajouter le MIDlet, Push registre, et autorisations attribue à la JAD ou manifeste, comme dans cet exemple JAD:
MIDlet-1: CalPushHandler
MIDlet-Permissions: javax.microedition.io.PushRegistry,
javax.microedition.io.Connector.socket
MIDlet-Push-1: socket: / /: 5012, CalPushHandler, *
Ces paramètres seront la cause CalPushHandler MIDlet de lancer en réponse à une demande de connexion entrante sur le port 5012.
Une entrée dynamique PushRegistry est bien le même que une entrée statique sauf que vous utilisez le PushRegistry.registerConnection () pour spécifier le Push Entrée au lieu d'utiliser le MIDlet-Push-
MIDlet-1: CalPushHandler
MIDlet-Permissions: javax.microedition.io.PushRegistry,
javax.microedition.io.Connector.socket
Le code source MIDlet sont les suivantes:
...
javax.microedtion.io.PushRegistry d'importation;
...
String connURL = "socket: / /: 5012";
MIDletStr String = "CalPushHandler";
FilterStr String = "*";
try (
PushRegistry.registerConnection (connURL,
MIDletStr, FilterStr);
) Catch (ClassNotFoundException CNF) (
...
) Catch (IOException ioe) (
...
)
...
Utilisation des alarmes pour lancer MIDlets
Le PushRegistry.registerAlarm () méthode présente un MIDlet pour lancer à une heure programmée. Il est proche de UNIX à (1) l'installation. La méthode nécessite un MIDlet dans la série actuelle de lancer, avec un temps. Spécifiez le MIDlet comme une chaîne et l'époque comme un java.util.Date. Un échantillon suit.
Dans la JAD ou fichier manifeste, insérer:
MIDlet-1: AlarmMIDlet
MIDlet-Permissions: javax.microedition.io.PushRegistr
Dans le code source MIDlet comprennent:
...
javax.microedtion.io.PushRegistry d'importation;
...
prevalarm long;
MIDletname String = "AlarmMIDlet";
nexttime Date = java.util.Date nouvelle () + 60000;
prevalarm = PushRegistry.registerAlarm (MIDletname, nexttime);
...
La spécification MIDP 2.0 limite le nombre d'alarmes par MIDlet dans une suite à un.
Notez que la spécification n'exige pas mises en œuvre pour soutenir ces caractéristiques PushRegistry. S'ils ne sont pas pris en charge, une exception sera levée ConnectionNotFoundException.
Un exemple
La suite de MIDlets échantillon illustre l'utilisation d'une entrée statique PushRegistry et du PushRegistry.registerAlarm () méthode. Notez que la suite de MIDlets ne comprend pas les composants de l'interface.
La suite de MIDlets contient deux MIDlets et une autre classe. Le PushMIDlet prévoit un délai de journée (TSD) service (voir: Internet Engineering Task Force RFC 867) en utilisant la classe DayTimeServer. DayTimeServer implémente l'interface Runnable, l'exécution du service TSD dans un thread séparé. DayTimeServer ouvre la connexion au serveur, accepte la connexion entrante (l'événement qui a initié le lancement MIDlet en premier lieu), répond au client avec l'heure actuelle comme une chaîne, ferme les connexions, et des sorties. Dans l'ensemble, pas très excitant, mais indicatif et extensible.
Le PushMIDlet enregistre également la AlarmMIDlet d'exécution 60 secondes après la PushMIDlet est lancé. Le AlarmMIDlet simplement re-soi calendriers à l'aide PushRegistry.registerAlarm (). Le résultat est le lancement récurrent de la MIDlet, semblable à la cron UNIX (1M) installation. Le AlarmMIDlet peut être facilement étendu pour inclure des activités plus intéressantes à être exécutés périodiquement.
Conclusion
Les deux nouveaux mécanismes de lancement de MIDlet que le MIDP 2.0 classe PuhRegistry prévoit de rendre possible la création de services plus riches en contenu. Pour plus d'informations sur le bouton enregistrer, voir l'article Le Push Registry MIDP 2.0
Use Push Registry for automatically Launch a MIDlet
Original message from: http://developers.sun.com/mobility/midp/questions/pushregistry/
If you want to launch MIDlet automatically, you can use Push Registry.
How to do ?
The PushRegistry class supports a "push" model of content distribution. Enabling a MIDlet to launch in response to an incoming connection or at a scheduled time makes whole new classes of services possible.
Specifying a PushRegistry entry requires four items:
* The MIDlet to be launched, specified using the MIDlet- attribute.
* If the MIDlet suite is signed, a Permissions request, using the MIDlet-Permissions attribute. The request must include at least the javax.microedition.io.PushRegistry method.
* An inbound connection URL, required by the Connector.open() method.
* A filter for inbound connections. The format of the filter is protocol-specific, but the filter "*" matches any string, and "?" matches any single character.
A PushRegistry entry can be specified in either a static or dynamic form.
A static PushRegistry entry is specified in the Java Application Descriptor (JAD) file, the manifest file, or both. The MIDlet, once installed, will always respond to the specified incoming connection. Add the MIDlet, Push Registry, and Permissions attributes to the JAD or manifest, as in this example JAD file:
MIDlet-1 : CalPushHandler
MIDlet-Permissions : javax.microedition.io.PushRegistry,
javax.microedition.io.Connector.socket
MIDlet-Push-1 : socket://:5012, CalPushHandler, *
These settings will cause the MIDlet CalPushHandler to launch in response to an incoming connection request on port 5012.
A dynamic PushRegistry entry is much the same as a static entry except that you use the PushRegistry.registerConnection() method to specify the Push Entry instead of using the MIDlet-Push- attribute. The MIDlet- attribute is still required in the JAD or manifest, as is the MIDlet-Permissions attribute, in the case of a signed MIDlet suite. A dynamic entry can be enabled (and disabled using the PushRegistry.unregisterConnection() method) after MIDlet suite installation. An example JAD file would contain:
MIDlet-1 : CalPushHandler
MIDlet-Permissions : javax.microedition.io.PushRegistry,
javax.microedition.io.Connector.socket
The MIDlet source code would include:
...
import javax.microedtion.io.PushRegistry;
...
String connURL = "socket://:5012";
String MIDletStr = "CalPushHandler";
String FilterStr = "*";
try {
PushRegistry.registerConnection(connURL,
MIDletStr, FilterStr);
} catch ( ClassNotFoundException cnf ) {
...
} catch ( IOException ioe ) {
...
}
...
Using Alarms to Launch MIDlets
The PushRegistry.registerAlarm() method sets up a MIDlet to launch at a scheduled time. It's similar to the UNIX at(1) facility. The method requires a MIDlet within the current suite to launch, along with a time. Specify the MIDlet as a String and the time as a java.util.Date. A sample follows.
In the JAD or manifest file, insert:
MIDlet-1 : AlarmMIDlet
MIDlet-Permissions : javax.microedition.io.PushRegistr
In the MIDlet source code include:
...
import javax.microedtion.io.PushRegistry;
...
long prevalarm;
String MIDletname = "AlarmMIDlet";
Date nexttime = new java.util.Date() + 60000;
prevalarm = PushRegistry.registerAlarm( MIDletname, nexttime );
...
The MIDP 2.0 specification limits the number of alarms per MIDlet in a suite to one.
Note that the spec doesn't require implementations to support these PushRegistry features. If they're not supported, a ConnectionNotFoundException exception will be thrown.
An Example
The sample MIDlet suite illustrates use of a static PushRegistry entry and of the PushRegistry.registerAlarm() method. Note that the MIDlet suite does not include any UI components.
The MIDlet suite contains two MIDlets and one other class. The PushMIDlet provides a time-of-day (TOD) service (see: Internet Engineering Task Force RFC 867) using the DayTimeServer class. DayTimeServer implements the Runnable interface, executing the TOD service in a separate thread. DayTimeServer opens the server connection, accepts the incoming connection (the event that initiated the MIDlet launch in the first place), responds to the client with the current time as a string, closes the connections, and exits. All in all, not very exciting, but illustrative and extensible.
The PushMIDlet also registers the AlarmMIDlet for execution 60 seconds after the PushMIDlet is launched. The AlarmMIDlet merely re-schedules itself using PushRegistry.registerAlarm(). The result is recurring launch of the MIDlet, similar to the UNIX cron(1M) facility. The AlarmMIDlet can easily be extended to include more interesting activities to be executed periodically.
Conclusion
The two new MIDlet-launching mechanisms that the MIDP 2.0 PuhRegistry class provides make possible the creation of more content-rich services.
If you want to launch MIDlet automatically, you can use Push Registry.
How to do ?
The PushRegistry class supports a "push" model of content distribution. Enabling a MIDlet to launch in response to an incoming connection or at a scheduled time makes whole new classes of services possible.
Specifying a PushRegistry entry requires four items:
* The MIDlet to be launched, specified using the MIDlet-
* If the MIDlet suite is signed, a Permissions request, using the MIDlet-Permissions attribute. The request must include at least the javax.microedition.io.PushRegistry method.
* An inbound connection URL, required by the Connector.open() method.
* A filter for inbound connections. The format of the filter is protocol-specific, but the filter "*" matches any string, and "?" matches any single character.
A PushRegistry entry can be specified in either a static or dynamic form.
A static PushRegistry entry is specified in the Java Application Descriptor (JAD) file, the manifest file, or both. The MIDlet, once installed, will always respond to the specified incoming connection. Add the MIDlet, Push Registry, and Permissions attributes to the JAD or manifest, as in this example JAD file:
MIDlet-1 : CalPushHandler
MIDlet-Permissions : javax.microedition.io.PushRegistry,
javax.microedition.io.Connector.socket
MIDlet-Push-1 : socket://:5012, CalPushHandler, *
These settings will cause the MIDlet CalPushHandler to launch in response to an incoming connection request on port 5012.
A dynamic PushRegistry entry is much the same as a static entry except that you use the PushRegistry.registerConnection() method to specify the Push Entry instead of using the MIDlet-Push-
MIDlet-1 : CalPushHandler
MIDlet-Permissions : javax.microedition.io.PushRegistry,
javax.microedition.io.Connector.socket
The MIDlet source code would include:
...
import javax.microedtion.io.PushRegistry;
...
String connURL = "socket://:5012";
String MIDletStr = "CalPushHandler";
String FilterStr = "*";
try {
PushRegistry.registerConnection(connURL,
MIDletStr, FilterStr);
} catch ( ClassNotFoundException cnf ) {
...
} catch ( IOException ioe ) {
...
}
...
Using Alarms to Launch MIDlets
The PushRegistry.registerAlarm() method sets up a MIDlet to launch at a scheduled time. It's similar to the UNIX at(1) facility. The method requires a MIDlet within the current suite to launch, along with a time. Specify the MIDlet as a String and the time as a java.util.Date. A sample follows.
In the JAD or manifest file, insert:
MIDlet-1 : AlarmMIDlet
MIDlet-Permissions : javax.microedition.io.PushRegistr
In the MIDlet source code include:
...
import javax.microedtion.io.PushRegistry;
...
long prevalarm;
String MIDletname = "AlarmMIDlet";
Date nexttime = new java.util.Date() + 60000;
prevalarm = PushRegistry.registerAlarm( MIDletname, nexttime );
...
The MIDP 2.0 specification limits the number of alarms per MIDlet in a suite to one.
Note that the spec doesn't require implementations to support these PushRegistry features. If they're not supported, a ConnectionNotFoundException exception will be thrown.
An Example
The sample MIDlet suite illustrates use of a static PushRegistry entry and of the PushRegistry.registerAlarm() method. Note that the MIDlet suite does not include any UI components.
The MIDlet suite contains two MIDlets and one other class. The PushMIDlet provides a time-of-day (TOD) service (see: Internet Engineering Task Force RFC 867) using the DayTimeServer class. DayTimeServer implements the Runnable interface, executing the TOD service in a separate thread. DayTimeServer opens the server connection, accepts the incoming connection (the event that initiated the MIDlet launch in the first place), responds to the client with the current time as a string, closes the connections, and exits. All in all, not very exciting, but illustrative and extensible.
The PushMIDlet also registers the AlarmMIDlet for execution 60 seconds after the PushMIDlet is launched. The AlarmMIDlet merely re-schedules itself using PushRegistry.registerAlarm(). The result is recurring launch of the MIDlet, similar to the UNIX cron(1M) facility. The AlarmMIDlet can easily be extended to include more interesting activities to be executed periodically.
Conclusion
The two new MIDlet-launching mechanisms that the MIDP 2.0 PuhRegistry class provides make possible the creation of more content-rich services.
Inscription à :
Articles (Atom)

 Articles


